Wednesday, October 13, 2010

Preparing is the hardest...

My blog today will be a somber one, for I am preparing myself to say goodbye to my cat of 13 years!  

You know your responsiblity one day will have to come to making that decision of when is the right time to do it!  Trust me your never prepared - your pets become your family members - they know when you need comforting and they know when to stay away.  But you know when you look into their eyes you melt... 

His time was with us is a "spoiled" one!  He was adopted from a shelter by my sister and has only had the BEST life a cat can have! 


It'll be hard to say goodbye!

Monday, October 4, 2010

Halloween Centerpieces

I was asked if I can make a centerpiece for a party someone is throwing during the Halloween season and to incorporate a "graduation" theme to the piece!  After some hemming and hawing (and 9 centerpieces later) here are they are!
get a load of the close-up of the crow - I made him wear the "graduation" cap!


I actually had fun creating these pieces - I spray painted the baskets, found those great branches at Pier 1.  I then proceeded to put Styrofoam in the basket placed the stick off center and place the grass around.  Next I hot glued several glittered leaves and the pumpkins on the grass.  Lastly the graduation hat - since it's off season for graduation hats I improvised...I saved the center from the paper towels and some card board - cut the roll approx. 1" and then the cardboard 3 x 3.  Painted it black. For the center of the cap I used a LaMode black shank button #20752.  With embroidery floss I made the tassel. So I improvised just a tad!

So thanks for stopping in again...

Happy Crafting...

Interesting Vases

So the other day I was dilly dalling in Home Goods (yeah)...and came upon these GREAT looking vases.  Do you remember when you were a kid and made those chain necklaces out of gum wrappers? Well someone came up with these vases....Now that's smart and fun.  If your ever tired of one of your vases why not try it - I think there may be one or two in my house!

I'm thinking you need some magazines, adhesives, paint (possibly spray paint) and a whole lot patience but just think of the "wows" you'll get.


Thanks for stopping  by hopefully this may have sparked an idea in your crafty mind!


Wednesday, September 15, 2010

Turquiose Necklaces

Every so often I like to dabble in other crafts - such as jewelry making.  I'm in no way and expert,  however I always like to walk into Michaels and walk down the bead ailse and keep saying I can do something with this or that.  So during the summer I saw these great turquoise and coral beads and along with several of my items I picked up on my vacation to Arizona (several years ago) I had to do something with these stones I couldn't just get them and have them collect dust.  How many of us have done that?

So here are my two necklaces - I made one for my aunt and the other for my mother and I to share. 


So I hope you enjoyed - and don't be afarid to TRY something new once in a while - you may be suprised!

Thanks for stopping in to see what I've been up too.

PILLOWS

I love this time of year!  Stores have changed their displays to incorporate fall, halloween and soon Christmas. Summer is officially over (yeah!)  Fall is my best time of the year - the colors, textures and Pier 1 store.  I was running some errands and happen to walk in and was "oohing and ahhhing" at all the great pillows.   

I just love the way they've embellished all of them with sew-on gems, seed beads and of course BUTTONS!   So I snapped some photos to show you - why not take your pillow and refresh???


fiber pillow

              
ric rak pillow


button covered pillow

sew-on gems
                                                                  
seed beads with gem button

ribbon flowers with buttons

 
So this was my exciting afternoon  and wanted to share with you all the great ideas that you can do too.

Thanks for stopping by to see what I've been up to...Happy Fall


Thursday, August 5, 2010

CRAFTING AT CHA SUPERSHOW

DAY 1 - CONSUMER SUPERSHOW...

Well it was just crazy all around - people scurring to see the newest, latest crafting techniques, products and the make-it-take it projects. The lines were just too long on some - but so worth the wait!

Blumenthal Lansing Company featured my bouquet that I made using thier Favorite Findings Matte and Felt buttons and assorted buttons! The two flower buckets were on the table during the show - hopefully I was able to inspire some ideas and combos!


 Of course i had to sit down and make my pin also...how cute and easy is this MTK...


Favorite Findings Matte and Felt buttons...combing addtional mini buttons from the Favorite Findings line!
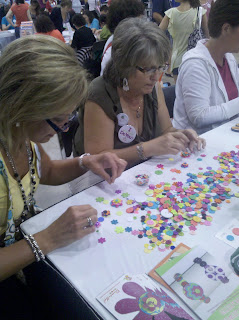
As you approached the table you were at a loss for buttons....buttons were spread all over the table too many to pick fun but everyone was creating...


Above photo is s Liane and Kim from Blumenthal Lansing and in the picture below Jane Anne and Rudy...


there was definetely a good time had by all who sat at the table. There was entertainment - sing alongs...Sonny and Cher, Donnie and Marie...

My tip for this craft project if  you want your young children to participate - substitute the wire for chenille stems works just as well!


DAY 2:  STACKABLE  BUTTON BEADED RINGS

Did we go to town on this project...we selected Coordinates Stackable buttons and some beads and wire and created Stackable Button Beaded Rings.  There were no two alike to be found.  My ring...


The show was great - people had fun and now I'm looking forward to CHA 2011!  Enjoy the photos...

CRAFTING AT THE CHA TRADE SHOW!


So finally I'm home from a long week of crafting at the CHA show in Rosemont, Il! I had so much fun and creating the great MTK's!

Day 1 - July 27th
On the first day of the trade show Blumenthal Lansing Company was making "Button Journals".  They provided you with the components to make it.  The project used their Damask button which is just rich - black with silver scroll work (I know I actually used this for a project that was featured for JoAnn Stores!). 


Here are the components that was provided:  mini composition book, 2 pcs of scrapbook paper, mini pom-pom trim, metallic trim, Favorite Findings assorted gems, glue.  From this you created your journal!
Here is another book that was made by a crafter:  Christmas ornaments - how adorable!

I could have stayed all day making more!

Day 2 - July 28th

You know I had to come back to the booth to see what was cooking at Blumenthal's booth - and boy did it feel as though Fall was in the air...
Todays project - Button Yarn Pins!  how cool...

Now I'm not 100% sure of all the components but I know that they will be posting all the instructions to the projects on their new web site:  http://www.blumenthallansing.com/.
Stackable buttons - which yo got to pick and choose from!
yarn - which you had to braid
2 round pre-cut scrapbook sheets
assorted fibers and feathers

After you picked your button - you selected the color yarn to work with (I actually made two! I came back at the end of the day!).  Okay now you braid the yarn - this was a bit long but you sat and chatted and listened to everyone talk and tell what they saw or who they were going to next (I heard Plaid was creating with "wine" glasses! hmmmmm).  Next step glue my two sheets together and then starting in the center of my paper and using Zip Dry Paper Glue (LOVE) you begin glueing your yarn down in circles till you get to the outer edge snip and tuck.  Now the fun part where you actually pick and choose the assorted fibers and feathers you want! Well since my coat is black I wanted more of a black/white/red story on each. So below is my Button Yarn Pin!


I'm sure I'll be combining these two pins together!

I thought this was a great button - it looks so vintage with the carved detailing on the black button and the thickness of the red button...


This was such great a great project to do and with all the yarns out there and the beautiful Coordinates Stackable buttons by La Mode - I guess a run to my local JoAnn stores to get more buttons how can you not! 


Day 3 - July29

Final day at the Trade Show...by feet are tired but my head is spinning with ideas!
Here I am at the Blumenthal Lansing booth - today "Button Rings"  using Coordinates Stackable buttons - fun and whimsical! OH HOW EASY are these to do! 
All you need are the buttons and clear transparente string and ring findings and beads and glue!
So here it is...


So for a quick project this is ideal...Always in the search for a ring to match your outfit now you can create it!

Thanks for stopping by and reading my button craft venture...

Thursday, July 22, 2010

My Attempt At Altered Art!

I'm always willing to try something new! So I tried Altered Art (atleast my version).  Do I think it comes close to Altered Art? Well? Probably not, but atleast I made a cute and simple mini journal.
So I've listed all the components below for you to try it!

So here is what my mini journals look like and hopefully you'll have just as much fun...


Scrapbook paper
Assorted La Mode buttons
Mini notebook
Paint/paintbrush
Brown Ink Pad
Glue
Assorted fibers, silk flowers
Scissors


Cut scrapbook paper - 3 1/4 x 4 1/5 (you'll need two - one for the front and one for the back).
Mix colors for painting the notebook binder.  I mixed white and nutmeg to get an aged vintage look.
Remember to paint the back also.Once you've achieved the color that you like then set aside to dry.
Glue scrapbook page to notebook, trim off excess.


Using the brown ink pad - run along edges to give it an aged, vintage look.
Glue ribbon to cover seam from scrapbook paper. Add fibers -glue


Glue additional scrapbook photos to journal.  Begin adding silk petals in corner as illustrated above.
Add buttons.
                                      

I hop you enjoyed making this quick mini journal.    These make cute inexpensive gifts.

Sunday, July 4, 2010

Cake Anyone?

Yum, ice cream cake to finish the festivities...I'm hoping eveyone had a wonderful fourth?!
Food was delicious, couldn't ask for better weather (other than it was hot- better hot then rainy!)
Before you know it we'll be saying where did the summer go - it went by so fast. Enjoy!

Thursday, July 1, 2010

4th July Barbecue


So you're having family and friends over for a barbecue and wondering how to add some "punch" to the table! After reading a post that was put on Blumenthal Lansings Facebook page, an idea was put out there and I thought it sounds like a fun idea -I can do that! Voila I think they came out great!   

 Remember it's fun and whimsical  - just have fun with it...


3 clay pots
Favorite Findings Big Value Bags #2008 Stars -  sort red, white and blue buttons.
Favorite Findings Patriotic #429
Favorite Findings - Traditional Mini Stars #1397
embroidery floss - red, white, blue
paint - red, white, blue  - I used PLAID acrylic paints (your choice)
paintbrush
ribbon - red, white, blue
glue - your choice

Directions:
1.  paint each pot one color (1 - red; 1 - white; 1-blue). Set aside and let dry.


2.  Favorite Findings Big Value Bag Stars has assorted colored star buttons. However, for this project you will only need the red, white and blue.  Set aside the other star buttons for future projects. The picture below shows the great variety of sizes that you'll get from the Favorite Findings buttons.


3. Begin stacking your buttons and with embroidery floss weave and knot on top.
4. glue ribbon to rim of pot.
5. start glueing buttons.

Now fill your patriotic pots with either flowers or better yet place utensils like I did. Remember to add some additional sparkle to the table by adding glitter confetti stars and remaining buttons...


Enjoy family and friends.
Enjoy the food.
Ooooh and Aaaaah at the fireworks.

Happy 4th July!